Raising the Young
© 1977 Poule d'eau Publishing Raising baby Button Quail need not be difficult, either with the use of an incubator or by allowing the female to incubate the eggs. There are some do's and don'ts to be aware of. First, newly hatched Button Quail chicks are capable of eating and drinking immediately upon hatching. They do not require hand care of any kind, and they should never be handled or played with. While Button Quail hens often hatch their own eggs, I will only discuss artificial raising of the chicks for now. If the eggs have hatched in the incubator, allow the chicks to remain there overnight. Provide the newly hatched chicks with a heated cardboard box (some breeders us an aquarium). The heating element should be a 25-40 watt light bulb. Do not use florescent lights, since they do not give off enough heat. Do not use heating pads, as you need the illumination of the bulb so that the quail can see to eat and drink continuously. For optimum growth, provide 24 hour illumination. Place a thermometer in the box and keep the temperature at about 95°F for the first week, and gradually drop the temperature by about 5 degrees per week. The bottom of the box should have indoor/outdoor carpet or some similar textured covering so the chicks can develop good posture. Do not use sand. It is messy and very difficult to clean. A smooth surface is deadly, because the baby quail will be unable to stand properly, and their legs will continuously slip out from beneath them. This is the main cause of splayed legs in chicks. If the chicks should slip even a few times during their first days of life they are prone to splayed legs and can be hopelessly doomed. Use the carpet! It can be washed, disinfected, and reused many times.
Sprinkle finely ground game bird starter crumbles (26-30% protein) over a good portion of the floor. To supplement the diet, you can offer finely ground boiled egg or some commercially prepared nesting food such as Protein 25 or Petamine. This gives newly hatched chicks a quick and healthy start. Provide a test tube waterer or self standing fountain watering device such as the ones that are designed to attach to the side of a finch or parakeet cage. These water devices are important, because anything larger might permit the tiny quail to become wet. Once wet, they must be dried and few survive. The test tube water device affords only a small drinking orifice, and the quail cannot get wet. As the young quail grow, switch to a mason jar watering fountain.
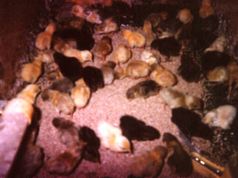
They can be safely removed from the brooder when they are 5-7 weeks old and placed in a larger cage or aviary.Look inside this cardboard brooder box to see a variety of young (1 week old) Button Quail
Look inside this wooden Brooder box to see a large assortment of newly hatched quail (photo by Chris Rogers)
Mutations of the Button Quail Cinnamon - Golden Pearl - Blue Face - Red Breasted - "Splashed" Button Quail